Product added to cart
Ultra-No Drain Hardtop P4 Plus (4 Drum Model) - Item #SC9636
$2,077.11
In stock
SKU
SC9636
- Ultra-Hard Top P4 Plus Spill Pallet, No Drain - 64.5 x 62 x 79 in.
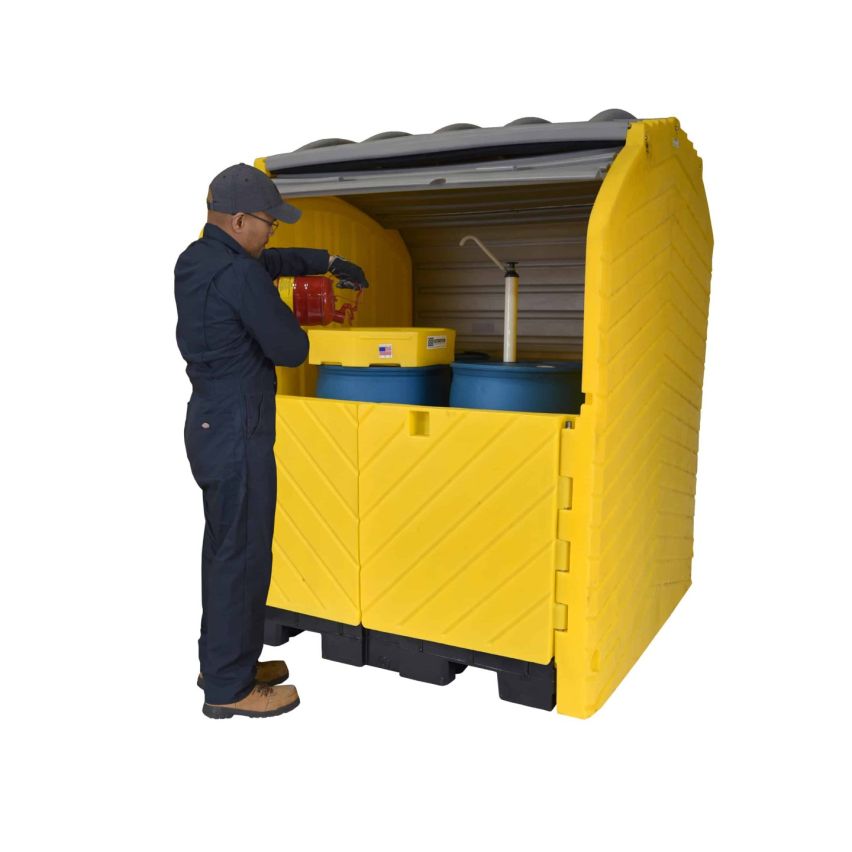
- Provides a safe, convenient and effective place to store one, two, three or four 55-gallon drums
Outdoor storage captures spills - keeps drums secure
The Ultra-Hard Top P4 Plus spill pallet provides a safe, convenient and effective place to store one, two, three or four 55-gallon drums. The roll-top doors above and swing out doors below provide complete and easy access to the inside spill containment area.
Simply place your drums inside of the unit with your drum handling equipment or with our optional ramp. Close the doors and you are done. Your drums are protected from the elements and unauthorized access (the unit can be locked) and your property is protected from spills or leaks.
Compliance
- EPA Container Storage Regulation 40 CFR 264.175
- Spill Prevention, Control and Countermeasure Act (SPCC) 40 CFR 112
- Stormwater Management Regulation 40 CFR 122.26
- National Pollutant Discharge Elimination System (NPDES)
- International Fire Code (IF) 5004.2.3
Specifications
- Dimensions: 64.5 x 62 x 79 in (1638.3 x 1574.8 x 2006.6) mm
- Load Capacity UDL lb.(kg) per sq. ft. 9,000 (4,082)
- Sump Capacity gal (L): 75 (284)
- Weight lb. (kg): 260.0 (118.0)
- Forklift Access: 2-Way
- # per Pallet: 1
- Composition: 100% polyethylene with UV inhibitors and fluorination gas treatment
- Color: Yellow / Gray
- Capacity: Four (4) 55-gal. Steel or Poly Drums
- Part #: 9636 (without Drain)
| Brand | UltraTech |
|---|---|
| Type | Hardtop Spill Pallet |
| Style/Model | 4 Drum |
| Drain | No Drain |
| Forklift Access | 2-Way |
| Dimensions | 64.5 x 62 x 79 in |
| EPA Compliant | Yes |
| SPCC Compliant | Yes |
| Stormwater Management Regulation Compliant | Yes |
| International Fire Code Compliant | Yes |
| NPDES Compliant | Yes |
| Material | 100% polyethylene with UV inhibitors and fluorination gas treatment |
| Amount Per Pallet | 1 |
| Load Capacity | 9000 lbs |
| Sump Capacity | 75 gal |
| Capacity | Four (4) 55-gal. Steel or Poly Drums |
| Features | Lockable |
Assembly Instructions
Note: 2 people will be required to assemble unit
Tools required:
• 5/8” Socket & Ratchet
• 9/16” Deep Well Socket & Ratchet
• Caulking Gun
Step 1: Place a 1-1/2” diameter flat washer (11) over the end of the 61-3/4” threaded rod (8). Slide the flat washer to the end of the rod with the 5/8” acorn nut (12) attached. Repeat this step with the remaining 61-3/4” threaded rod (8).
Step 2: Place pallet sump (3) on a flat surface. Place a sidewall (1) on each side of the pallet sump. With someone supporting the sidewalls, align the cutouts on the side and corners on the pallet sump with the mating features on the sidewall. (Note: If the pallet sump has a drain make sure it is facing front and not being covered by the sidewalls).
Step 3: Slide the end of the 61-3/4” rod assembly through the hole at the bottom of sidewall. After passing the rod through the sidewall 2” or 3”, place the black plastic rod cover tube (14) onto the end of the rod. Slide the rod through the cover tube and through the corresponding hole in the opposite sidewall. Place 1-1/2” diameter flat washer (11) and a 3/8” locknut (13) on the end of the rod. Just start the nut about a ½” on the rod. (DO NOT TIGHTEN). Repeat this step for the remaining hole at the bottom of the sidewall (Note: Always enter the rod from one side of unit so the all the acorn nuts are on the same side).
Step 4: Place a 1” diameter flat washer (10) over the end of the three 63” threaded rods (9). Slide the washers to the end of the rods with the acorn nut attached. Using the same sidewall that the acorn nuts are on, pass one threaded rod through one of the outside top holes in the sidewall and though the corresponding holes in the opposite wall. Place a 1” diameter flat washer (10) and a locknut on the end of the rod. Just start the nut on the end of the threaded rod. (DO NOT TIGHTEN) Repeat this step for the remaining outside top hole in the sidewall.
Step 5: Thoroughly caulk both sidewalls in the mating channels and rectangular cut for the roof features.
Step 6: Place the roof on the top of and between the sidewalls. The top should drop down into the rectangular cutouts in the sidewalls. Slide the remaining threaded rod assembly through the remaining peak hole in the side and through the mating holes in the roof peak. Then slide the rod through the corresponding holes on the opposite side of the roof and sidewall. Place a 1” diameter flat washer (10) and a locknut on the end of the rod. Just start the nut. (DO NOT TIGHTEN).
Step 7: Place the top left edge of the roll top door (2) in the track in the left sidewall. Then place the right top edge of the roll top door to start into the track of the right sidewall. Push up on the bottom of the roll top door. This will feed the remainder roll top door edge into the tracks. Repeat this step for the opposite side. (Make sure that the roll top door on the opposite side is in the closed position.)
Step 8: Tighten each outside top rod, by holding the acorn nut and turning the locknut until you visibly begin to see the edge of the roof line bow. While tightening make sure that the tongue on the roof edge is inserted in the corresponding wall groove. Then tighten the peak rod until you visibly see the peak roofline begin to bow. (DO NOT OVER TIGHTEN RODS) Inspect roof seams to make sure they are thoroughly sealed. Additional sealant maybe applied from the top if any voids are noticed in the rectangular cutout area. Wipe off or smooth out any sealant that may have squeezed out of the seams.
Step 9: Align the right door (4) hinge with the mating hinge on the sidewall. Align the door hinge pin holes with the hinge pin holes in the sidewall. Slide the hinge pin tube (7) into the aligned holes (Note: It may be necessary to move the door and tap the hinge pin tube with a hammer until the hinge pin tube is fully seated all the way through the hinge holes.) Repeat this step for the remaining right door (4) and to the remaining left doors (5).
Step 10: Tighten the bottom threaded rod (8), by holding the acorn nut (12) and tightening the locknut until the gap seen between the 2 doors at the bottom is about ½”. Repeat this step for the other set of doors.
Step 11: Place the black plastic rod end caps (15) over each of the exposed threaded rod ends on the locknut side.
The Ultra-Hard Top P4 Plus is now ready for use.
Write Your Own Review
Related Products