Product added to cart
Ultra-With Drain Hardtop P2 Plus (2 Drum Model) - Item #SC9613
$1,392.30
In stock
SKU
SC9613
- Ultra-Hard Top Spill Pallet P2 Plus With Drain - 67.3 x 41.3 x 74 in
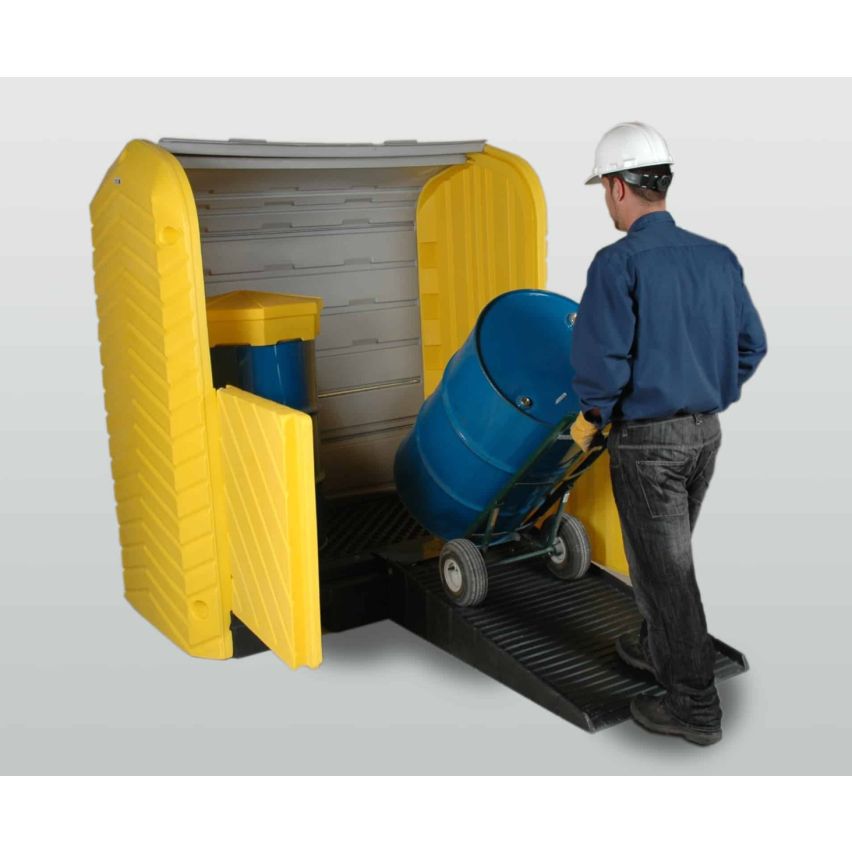
- Provides a safe, convenient and effective place to store one or two 55-gallon drums
Store hazardous drums safely outdoors with pumps and funnels in place.
The Ultra-Hard Top P2 Plus spill pallet provides a safe, convenient and effective place to store one or two 55-gallon drums. The roll-top doors above and swing out doors below provide complete and easy access to the inside spill containment area.
Simply place your drums inside of the unit with your drum handling equipment or with our optional ramp. Close the doors and you are done. Your drums are protected from the elements and unauthorized access (the unit can be locked) and your property is protected from spills or leaks.
Warranty:
Protected by the industry’s strongest warranty – Five years against any material or workmanship defects.
Compliance:
- EPA Container Storage Regulation 40 CFR 264.175
- Spill Prevention, Control and Countermeasure Act (SPCC) 40 CFR 112
- Stormwater Management Regulation 40 CFR 122.26
- International Fire Code (IF) 5004.2.3
Specifications
- Dimensions: 67¼ x 41¼ x 74 in (1,708 x 1,047 x 1,677 mm)
- Load Capacity UDL lb.(kg): 4500 (2,041)
- Sump Capacity gal (L): 66 (250)
- Weight lb. (kg): 260.0 (118.0)
- Forklife Access: 2-Way
- # per Pallet: 1
- Composition: 100% polyethylene with UV inhibitors
- Color: Yellow/ Gray
- Capacity: Two (2) 55-gal. Steel or Poly Drum
- Part #: 9613 (with Drain)
| Brand | UltraTech |
|---|---|
| Type | Hardtop Spill Pallet |
| Style/Model | 2 Drum |
| Drain | With Drain |
| Forklift Access | 2-Way |
| Dimensions | 67¼ x 41¼ x 74 in |
| EPA Compliant | Yes |
| SPCC Compliant | Yes |
| Stormwater Management Regulation Compliant | Yes |
| International Fire Code Compliant | Yes |
| Material | 100% Polyethylene with UV Inhibitors |
| Amount Per Pallet | 1 |
| Load Capacity | 4500 lbs |
| Sump Capacity | 66 gal |
| Capacity | Two (2) 55-gal. Steel or Poly Drum |
| Features | Lockable |
Assembly Instructions
Note: The installation of the back panel to the sidewalls will require 3 people.
Lay the left (3) and right (4) sidewalls on the floor with the hinges facing down.
Slide the back panel (7) in the channel at the bottom of the sidewalls.
Continue to slide the back panel up the channel until the last rib on the back panel aligns with the holes in the bottom of the sidewalls.
Note: The all thread rods (12) will have an acorn nut (10) installed at the factory with thread locker applied to the all thread rod and acorn nut.
Slide a 1 ½” flat washer (9) over the end of the rod. Slide the rod through the hole in the sidewall and the slotted hole in the rib. From underneath continue to side the rod through the slotted hole in the rib and the hole in the sidewall on the opposite side.
Attach a 1 ½” flat washer and nylon locking nut (11) to the end of the rod. Only finger tighten the nylon locking nut. Repeat this step for the next hole on the side wall and slotted rib hole.
Do not place a rod in the 3rd hole from the bottom; this rod will be attached later.
Repeat the steps above for the final hole in the top of the sidewall.
Stand the assembled sidewall and back panel upright and place the all thread rod through the 3rd hole from the bottom using the same steps to attach this rod as the previous rods.
Place the assembled sidewalls and back panel on top of the spill pallet (1) with the grate (2) installed.
The bottom tabs on the sidewalls fit into notches in the sides of the spill pallet and the upper tabs on the sidewalls should rest in notches on the top of the spill pallet.
Slide the rolling door (8) in the slots in the sidewall, then slide the rolling door up sidewalls until the all of the door edges are inside the channel.
On the back panel tighten the 3rd threaded rod from the bottom to a distance of 59 ¾” between the sidewalls. Then tighten the top threaded rod to a distance of 59 ¾” between the sidewalls.
Install the left (5) and right (6) doors by aligning the hinge hole in the door with the hinge hole in the sidewall.
Start the ½” EMT conduit into the aligned holes, then finish tapping the conduit through the remaining holes till the top of the conduit is below the top of the door.
Place a plastic thread cap (15) on each of the threaded rod ends.
The Ultra-Hard Top P2 Plus is now ready for use.
Write Your Own Review
Related Products